Many beginners make the mistake of not optimizing images. this can make your website slower. In this article, we will show you how to optimize images for faster web performance without losing quality. We will also share automatic image optimization plugins for WordPress that can make your life easier. This is an updated article.
What is Image Optimization?
Image optimization is a process of storing and delivering images in the smallest possible file size without compromising the quality of the image.
While the whole process sounds difficult, it is actually quite easy. Therefore, there are many plugins and tools for image optimization. Here is an example of an optimized and an unoptimized image:

How image optimization works
Image optimization works using compression technology such as “Lossy” and “Lossless”. This technology helps reduce the overall file size without noticeable quality loss.
What does it mean to optimize images.
If you've ever received a recommendation to optimize images by your WordPress hosting support or by your speed test, it means you should just reduce the file size of your images by optimizing them.
Why is image optimization important? what are the benefits of image optimization?
While optimizing your images has many benefits, below are the main reasons you should know.
- Higher website speed;
- better ranking in the search engines;
- higher total conversion rate for sales and leads;
- less storage and bandwidth (which can lower hosting and CDN costs);
- faster website backups (reduces the cost of backup storage). Apart from videos, images are the most heavy items on a web page. According to the HTTP archive, photos make up an average of 21% percent of the weight of the total number of web pages. Because we know that fast websites rank higher in search engines (SEO) and have better conversions, image optimization is something every business website must have if they want to succeed online. According to a study by Strangeloop , a one second delay in website loading time can cost 7% of sales, 11% fewer page views and 16% less customer satisfaction. This means that by optimizing your images on your website, you can improve the speed of the website and increase the WordPress SEO rankings.
How should you save and optimize images for web performance?
The key to successful image optimization for web performance is finding the perfect balance between the lowest file size and acceptable image quality. Three things therefore play a major role in image optimization;
- Image file format (JPEG, PNG & GIF)
- Compression (higher compression = smaller file size)
- Image dimensions (height and width) By choosing the right combination of the three, you can reduce your images by up to 80%. Let's take a closer look at each of these.
Image file format
For most website owners, the only three image file formats that really matter are JPEG, PNG, and GIF. Choosing the right file type plays an important role in optimizing images. To keep things simple, you'll want to use a JPEG for photos or images with a lot of color, PNGs for simple images or when you need transparent images, and GIF for animated images only. For those who don't know the difference between each file type, the PNG image format is uncompressed, meaning it is a high-quality image. The downside is that the file sizes are much larger. On the other hand, JPEG is a compressed file format that slightly reduces the image quality to provide a smaller file size. A GIF uses 256 colors, along with lossless compression, making it the best choice for animated images.
Compression
Next is image compression, which plays a big role in image optimization. Different levels of image compression are available. The settings of each setting vary depending on the image compression tool you are using. Most of the image editing tools like Adobe Photoshop, On1 Photo, Gimp, Affinity Photo and others come with built-in image compression features. You can also save images normally and then use a web tool like TinyPNG or JPEG Mini for simple image compression. While it's a bit manual, these two methods allow you to compress images before uploading them to WordPress.
Image dimensions - scaling images
Normally, a photo from your phone or digital camera has a very high resolution and large file size. These photos usually have a resolution of 300 DPI and dimensions from 2000 pixels and more. These high-quality photos are great for print or desktop publications. For example, we optimized a photo with an original file size of 1.8 MB, a resolution of 300 DPI and image dimensions of 4900 x 3200 pixels. We chose JPEG format for higher compression and changed the dimensions to 1200 x 795 pixels, and this reduced the file size to 103 KB. That's 94% less than the original file size.
Best image optimization tools and programs
As we mentioned earlier, most image editing software come with image optimization and compression settings. In addition to the image editing software, there are also several powerful free image optimization tools you can use to optimize images for the web. We recommend using these tools to optimize images before uploading to WordPress.
Adobe Photoshop
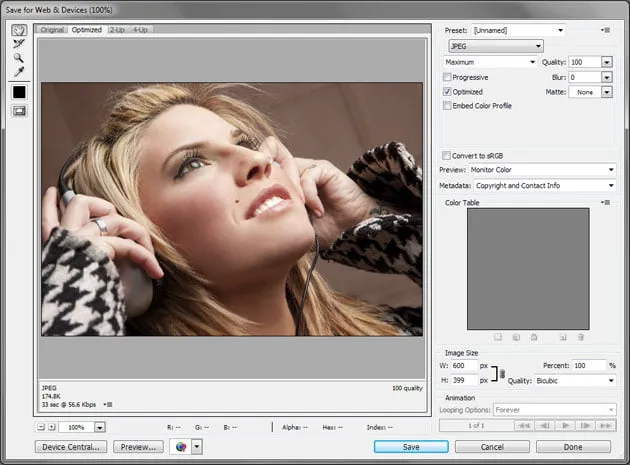
Adobe Photoshop is a premium software that comes with a function to save images optimized for the web. Simply open your image and click on the option "File - save for web".
This will then open a new dialog box. On the right you can set different image formats. For JPEG format you will see several quality options. When you select your options, the file size is also shown in the bottom left corner.
GIMP
Do you want to edit something quickly and do you find such an Adobe Photoshop package too pricey? Then you can look at Gimp , for example . Gimp is a free alternative to Photoshop. It may not look as nice and comprehensive as Photoshop, but you do have the web optimization feature.
Gimp, a nice alternative to Adobe Photoshop, available for free.
Companies positive about Gimp
Lifewire gave Gimp a positive review in March 2019: “For those who don't use Photoshop, GIMP is simply a very powerful image manipulation program. If you're willing to invest some time to learn how to use it, it can be a very good graphical tool. ” Gimp is regularly assessed positively by professionals; it is often compared to and suggested as a possible replacement for Photoshop. The functionality leaves little to be desired, but the user interface takes some getting used to. The video game Lucas the Game , from developer Timothy Courtney , was made largely design-wise with Gimp version 2.6. The developer says that Gimp is a powerful tool that is certainly suitable for large professional projects, such as video games. Also Michael Burns Macworld is enthusiastic about the software, especially after the wave of improvements in the program. All in all, a worthy alternative to Photoshop for anyone with a limited budget and some eagerness to learn.
Photopea
Photopea is a free advanced photo editing program, which can work with both raster and vector graphics. You can use it for simple tasks such as resizing images. Also for more complex tasks, such as designing web pages, making illustrations and more. To work with Photopea you only need your browser, no installation is required. You go to photopea.com and you can get started right away. Photopea can be used on desktop, tablet or mobile. However, in terms of working comfort, we recommend working with a large screen and mouse & keyboard. As the image below shows, optimizing for the web is also possible. In the Save for web window we have set the quality level here to 50%. This reduced the file size to 70.6 KB. You can see this at the bottom. Plus, just like Photoshop and other tools, the preview shows you what the end result will look like. So to what extent there may be a loss of quality.
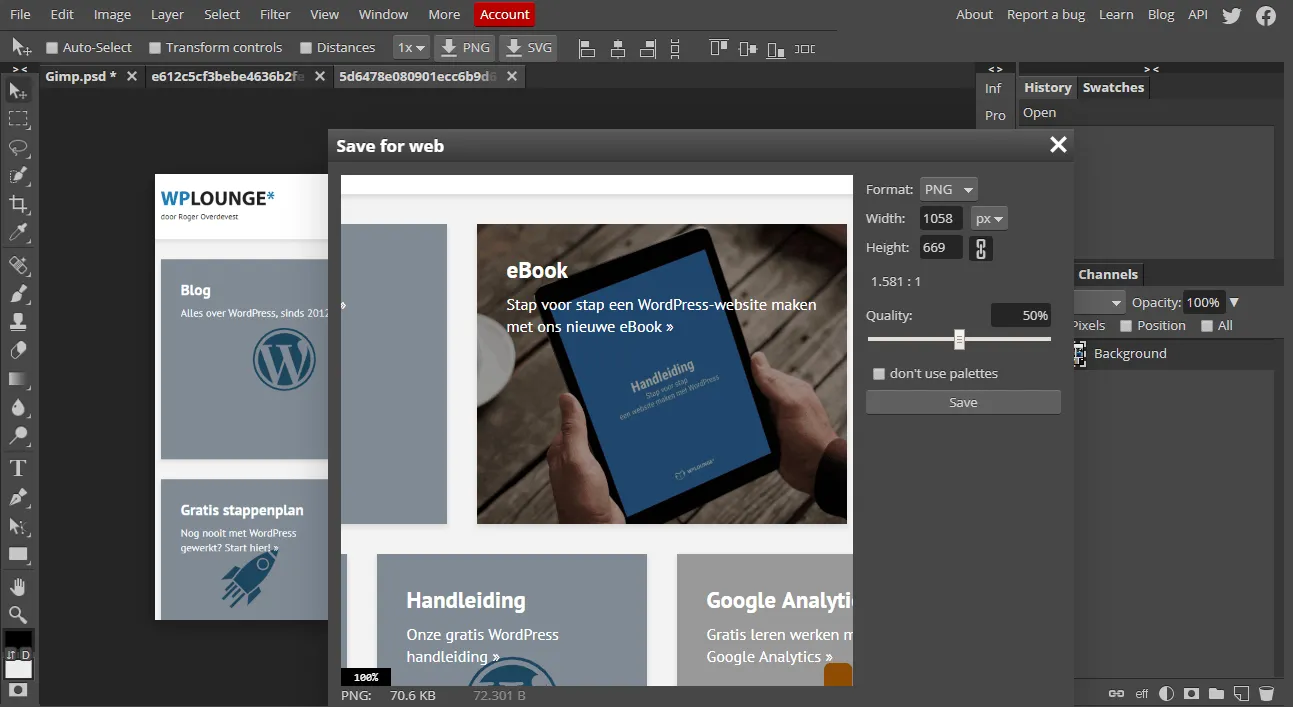
Save with optimization for the web. Photopea.com - No installation, get started right away, without payment.
No data is uploaded to the internet, everything stays on your device. You can load Photopea, disconnect from the internet and continue offline. The editor has evolved over 4 years. In terms of complexity, it can be placed next to Adobe Photoshop or Gimp. The starting point of the makers of Photopea was:
- Making advanced photo editing accessible to everyone in terms of cost and system requirements
- Facilitate support of all existing files
- Making designers less dependent on their graphics software when it suddenly stops working
TinyPNG
TinyPNG is a free web app that uses a smart lossy compression technique to reduce the size of your PNG file. All you have to do is go to their website and upload your images. They will compress the image and give you the download link. You can use the sister website, TinyJPG, for JPEG image compression they also have an extension for Adobe Photoshop which we use as part of our image editing process as it combines the best of TinyPNG and TinyJPG in Photoshop
JPEG Mini
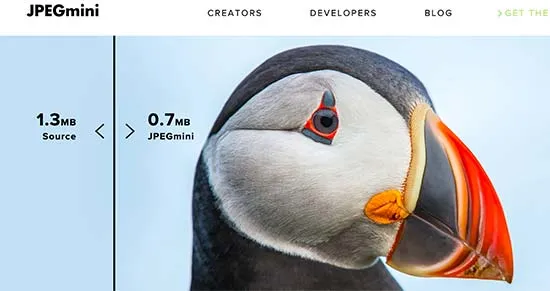
JPEGmini uses a compression technology that significantly reduces the size of images without affecting their quality. You can also compare the quality of your original image with the compressed image
ImageOptim
ImageOptim is a Mac utility that allows you to compress images without losing quality by finding the best compression parameters and removing unnecessary color profiles. The Windows alternative to this is called Trimage.
The best image optimization plugins for WordPress
We believe the best way to optimize your images is to optimize the images before uploading to WordPress. Below is a list of the best WordPress compression plugins for images.
- EWWW Image Optimizer
- Imsanity
- WP Smush
WP Smush
WP Smush is a WordPress plugin that allows your images to optimize without in delivering quality. Some image compression plugins shrink images with an unnecessary loss of quality.
The WP Smush tool removes hidden data from images and reduces the file size without affecting the appearance of your photos. Smush carefully scans every image you upload or have already added to your website.
Then the plugin removes all unnecessary data and scales it for you before adding it to the media library .
Benefits of WP Smush
WP Smush is very user-friendly and you can instantly optimize your images while uploading them to your WordPress site. For your older images, go to Media> WP Smush and you can bulk smush 50 images at a time. For beginners, it is a simple and fast way to optimize images and thereby improve website performance.

WP Smush here optimizes all 187 images in bulk.
Disadvantages of WP Smush
The performance difference is not as significant as you might think. After optimization, other methods give even bigger increases in the performance score of the website. For example, if you upload a 3MB photo to your website, WP Smush will reduce it by 10 to 20 percent without any loss of quality. At that moment it will still be a file of more than 2 mb, which is simply way too much. WP Smush does not give you control over how strongly you can optimize an image. While it will reduce the file size of the image, it is not the number one solution.
EWWW Image Optimizer
EWWW Image Optimizer is a WordPress plugin that optimizes your images as you upload them. A functionality that WP Smush also offers. You can also optimize previously uploaded images with EWWW. You can also convert the photos to other image formats, so you can choose a format that gives a lower image size.
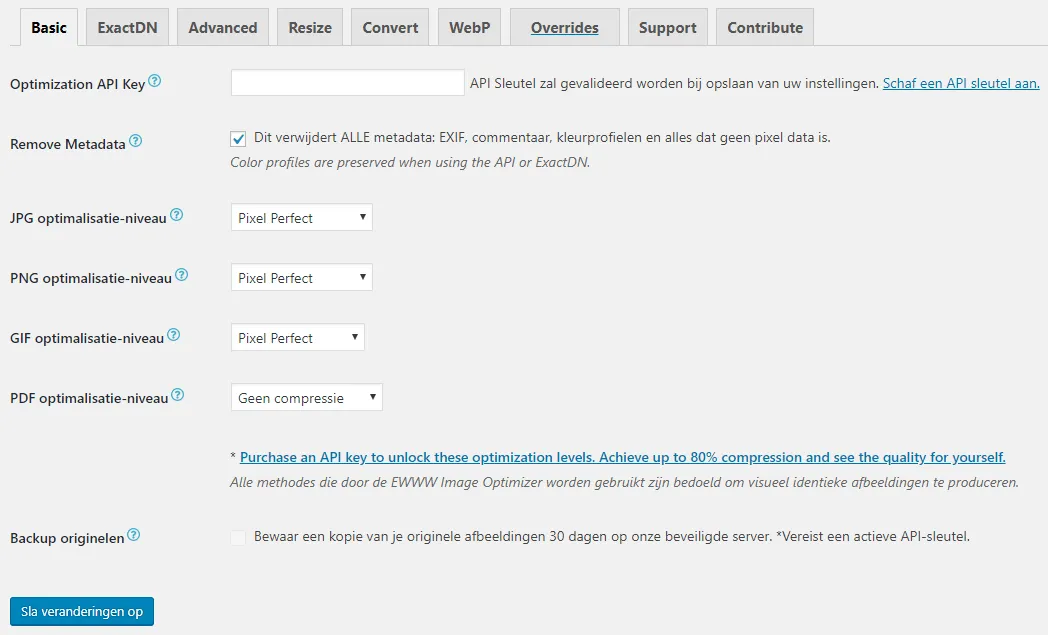
The settings screen of EWWW Image Optimizer, here you also see the next-gen format called WebP.
For example, if you upload an image in .webp format, you can convert it to .webp or even a next-gen format like WebP, resulting in a much smaller file size.
Imsanity
No insanity 😉 Imsanity allows you to bulk resize large images in WordPress. Unlike WP Smush and EWWW Image Optimizer, Imsanity allows you to choose a default maximum size for your images. You can go for the so-called standard compression, which optimizes your images to an adequate size in .webp format. The Imsanity plugin can also be used to automatically convert image formats from .bmp to .webp, .webp to .webp and so on.
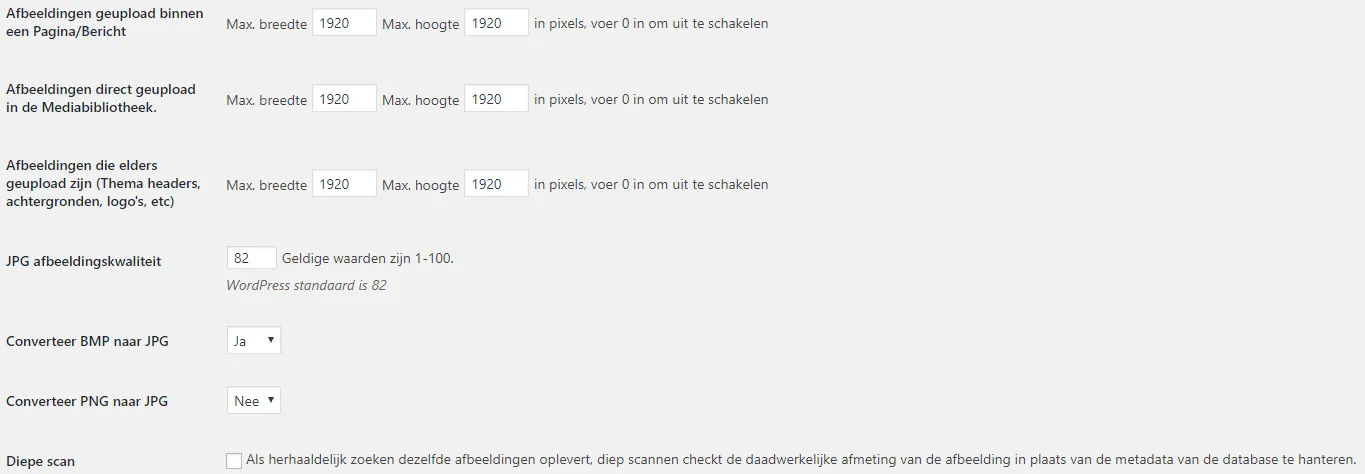
Imsanity WP plugin settings
Conclusion
All these WordPress plugins do their job well. Are you into the finer points and do you want complete control? Then you better choose to perform image optimization for web outside of WordPress using Adobe Photoshop or a free alternative. We hope this article has helped you learn how to optimize images.
FAQs About Image Optimization and Compression
How do I compress images in WordPress?
With the help of plugins and tools, Images can be easily compressed without losing image quality. You can use plugins and tools like TinyPng, EWWW etc for better image compression.
What is the best image format for WordPress?
The best formats for wordpress websites are JPEG and PNG. Use a JPEG for photographs as they have a high color count. This format uses special compression in order to reduce file size while not affecting the clarity and quality of the images.
What is the best image size for website?
The dimensions of the original image you upload to your site can have a big impact on how it displays. We recommend using images that are between 1500 and 2500 pixels wide. Images smaller than 1500 pixels may appear blurry or pixelated when they stretch to fill containers, such as banners
Loading comments...
